söndag 30 november 2014

Boktomten i trädet

Hej på er!

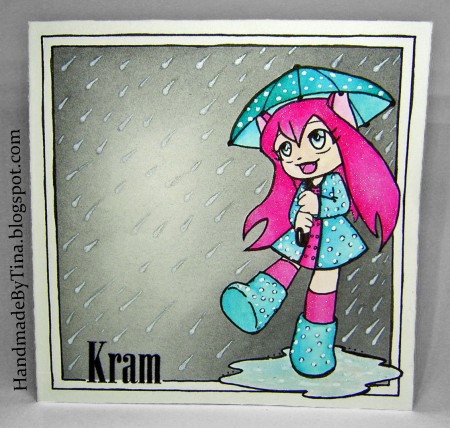
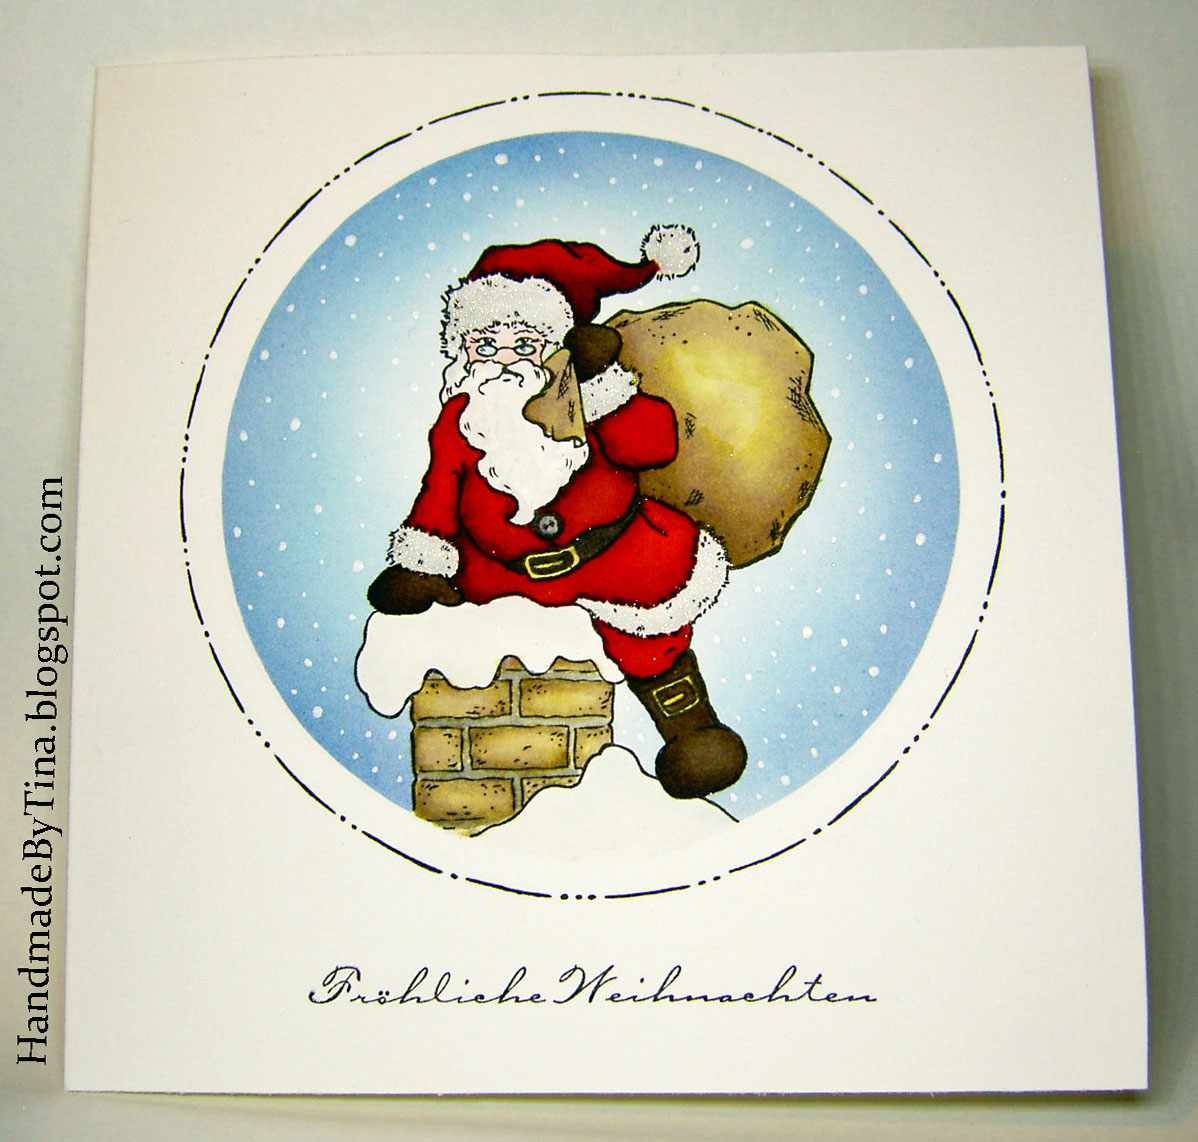
I dagens första inlägg så tänkte jag inspirera er med detta kort. Här har jag maskerat in boktomten från V, i trädet från V och sedan stämplat den fina texten från V.
Allt på kortet är färglagt med distressfärger och snödetaljerna är gjorda med Chunky white embossing enamel, Gesso och vit gel-penna.


Lämna gärna en kommentar och berätta vad ni tycker!
Tack för titten!
//Tina

lördag 22 november 2014

Santa´s on his way

Hi everyone!

Today I want to share a christmas card with Santa on his way down the chimney.
The stamps i used are Santa V355 and the sentiment V721


I hope you enjoyed this post. Please leave a comment to let me know what you think.
//Tina

torsdag 20 november 2014

Christmas calories

Hello everyone!
In this post I want to inspire you with a christmas card I made with a cute little cupcake V110 and a suiting sentiment V805 to go along with it.
The sentiment is in german and it translates to "everyone knows that christmas calories doesn´t count".
I first stamped my sentiment, then masked off the line of words on the upper line with a strip of post-it and stamped my cupcake.
I colored my image and also made a background by masking off the edges of the paper and then used distress ink to color it in.

Thank you so much for checking in!
I hope you enjoyed, please leave a comment to let me know what you think.
//Tina

onsdag 12 november 2014

Dancing in the rain

Hello everyone!
This is my last post for today and I thought I´d share this little card. It´s only 10×10 cm, but I think that only adds extra cuteness, because small things equal CUTE! (wouldn´t you agree :)?)
The cute little manga girl (V232)  is from one of the Sugarbat kits and even though it´s raining she´s happy anyway! She is colored with Tattered Rose, Peacock Feathers and Picked Raspberry distress inks. As you probably know by now, I love using masking techniques, so of course I made a mask out of a post-it note and masked her off. I then masked off the edges of the card and used a blending tool and Black Soot distress ink to make the background. I took of the maskes and stamped my seniment (V723), and used a ruler to draw some lines around the card, I went back around the lines once again with the marker but without the ruler to make the lines look more organic. To finish it of I used a white gel pen to make the rain drops and the polka dots on her umbrella, coat and boots, and added a little shimmer to her hair and the raindrops.

PICT2229;E
Thanks for your visit. Don´t forget to leave a comment to let me know what you think!
//Tina

tisdag 11 november 2014

Take-away-mug container

Hello everyone!
In this post, I would like to show you a cute little container I made (believe it or not) out of a large corrugated take-away coffee mug. I got this idea from Jennifer Mcguire who did this folding technique, but with a small plastic cups. And I thought, why not try this? So I got this large-black-take-away-coffee-paper-cup and covered the whole thing in gesso, cut slits about half way down the cup and about 1.5 cm apart. I then punched holes in each flap to make room for the string to fit through, so I could pull the top closed. To decorate I punched out a strip of “lace” and adhered where the slits ends. I then made my tag. I punched out the tag three times in cardstock and adhered them back-to-back to make it a chipboard-like thickness and colored the edges black with a marker. I stamped the image and the words I wanted cut them out and colored the edges black. The words are from different stamp sets. “Höst” and “Favorit” are from the kit V743 and “En” and “Underbar” are from the kit V674 and the mushrooms are from V153.
PICT2189;E
PICT2193;E
I hope you enjoyed this post. Please leave a comment to let me know what you think.
//Tina

lördag 1 november 2014

Brevlådan, en favorit från förr.

Hej på er!
Idag fick jag en förfrågan om den här lådan som jag gjorde redan 2010 och jag lovade du att lägga ut den på nytt. Så här kommer en favorit från förr, den bokstavliga BREVLÅDAN.

Här kommer beskrivningen där jag visar hur en till synes enkel brevhög blir något alldeles extra!


Materialet du behöver är
7st. kuvert (Jag har använt C6)
6st. ark med wellpapp (Skrurna till något mindre storlek än kuverten)
1st. ark med cardstock (Valfri färg, är till lådans insida)
En bit spillpapper
Ink blending tool
Distress ink-stämpeldyna (Jag har använt "Vintage photo")
Dubbelhäftande tejp
Linjal
Skalpell
Skärmaskin
Falsben
Penna
Valfritt dekorationsmaterial

OBS! Jag har inte skrivit ut några mått, man kan använda vilken storlek på kuvert som helst och därmed ändra insidans storlek efter tycke och behag. Jag har använt C6 kuvert och insidans mått är 10X7cm. Givetvis kan man använda så många kuvert man vill. OBS!


Tack för titten!
Lämna gärna en kommentar och låt mig veta vad du tycker.
//Tina