torsdag 19 mars 2015

Pojken i trädet - The boy in the tree

Hej hej!
Här kommer ett kort med lite hösttema.
Stämplarna jag använt är:
Texten V492
Pojken V111
Lampan V807
Trädet V817 
________________________________________________________
 
Hello!
Here´s a card I made with a fall theme.
The stamps I used are:
Text V492
  Boy V111
  Lamp V807
Tree V817


Tack för titten! - Thanks for your visit!
//Tina

tisdag 17 mars 2015

Snötäckte holkar / Bird houses covered in snow

Hej hej!
Här kommer dagens inlägg, och det blir ett snöigt kort med ett hem för fåglarna.
Stämplarna jag har använt är ifrån kitet V219 hos Vilda stamps och bilden är färglagd med distressfärger.
_______________________________________________________________________

Hi there!
Here´s today´s post, and it´s a snowy card with homes for the birds.
The stamps I´ve used are kit nr. V219 fron Vilda stamps, and everyting is colored with distress colors.


Tack för titten!
___________________________________

Thanks for checking in!

//Tina

måndag 29 december 2014

Naughty or nice?

Hej på er!
Nu är det dags för dagens inlägg och i det så vill jag visa er ett julkort.
Ja, julafton är ju över, men jag tror att det nog hänger kvar lite julkänsla hos de flesta ännu.
På detta kortet så har jag använt sex stycken olika stämplar, från Vilda stamps.

Allt är färglagt med Distressfärger och texten har jag gjort genom att tillfälligt placera en utstansad text på kortet och rita runt om.
Jag har även skrivit till text på skylten och ritat lite järnek på den.

Jag hoppas att ni gillade kortet!
Lämna gärna en kommentar och säg vad ni tycker!
Tack för titten!
//Tina

onsdag 3 december 2014

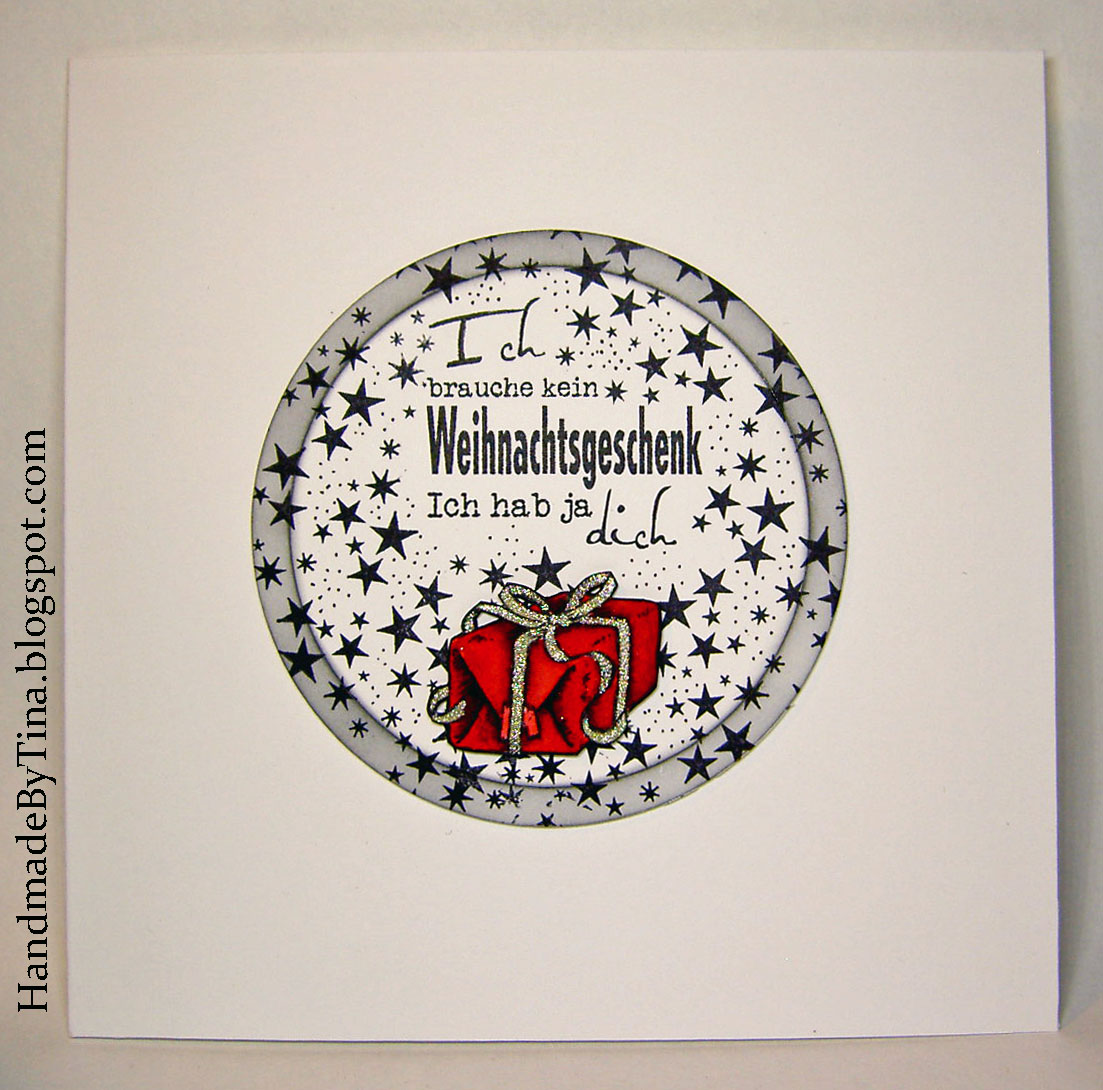
Weihnachtsgeschenk

Hi there!
Today I want to show you a christmas card made with two wonderful stamps the sentiment V805 and the gift V188. I separated the stars from text on the sentiment and used the stars to make the background.
PICT2123;E
I hope you enjoyed this post. Please leave a comment to let me know what you think.
//Tina

måndag 1 december 2014

Bokmusens julafton

Hej hej!
Då var det dags för dagens andra inlägg och även det blir ett julkort, denna gång med en liten mus som sitter uppkrupen med en bok inuti stubben som han bor i.
Detta kortet gjorde jag redan till göteborgsmässan som var nu under hösten, så det kan kan hända att några av er har sett det där.
Den enda av stämplarna som är stämplade direkt på bakgrunden är jultexten V271, alla de andra är stämplade, färglagda, utklippta och sammansatta.
På detta kortet så ville jag verkligen att den lilla musen skulle sitta och julmysa i sin stubbe och då passade ju en tomteluva väldigt fint, så jag stämplade och klippte ut en luva från en av de två små nissarna V397 och satte den lite på sniskan på hans huvud. Ljuset V359 fick sig en nu ljusstake, nämligen tunnan från V219.
Bakgrunden och kudden han lutar sig mot har jag ritat för hand.


Jag hoppas att ni gillade detta kortet.
Lämna gärna en kommentar och låt mig veta vad du tycker!
Tack för titten!
//Tina

söndag 30 november 2014

Boktomten i trädet

Hej på er!

I dagens första inlägg så tänkte jag inspirera er med detta kort. Här har jag maskerat in boktomten från V, i trädet från V och sedan stämplat den fina texten från V.
Allt på kortet är färglagt med distressfärger och snödetaljerna är gjorda med Chunky white embossing enamel, Gesso och vit gel-penna.


Lämna gärna en kommentar och berätta vad ni tycker!
Tack för titten!
//Tina

lördag 22 november 2014

Santa´s on his way

Hi everyone!

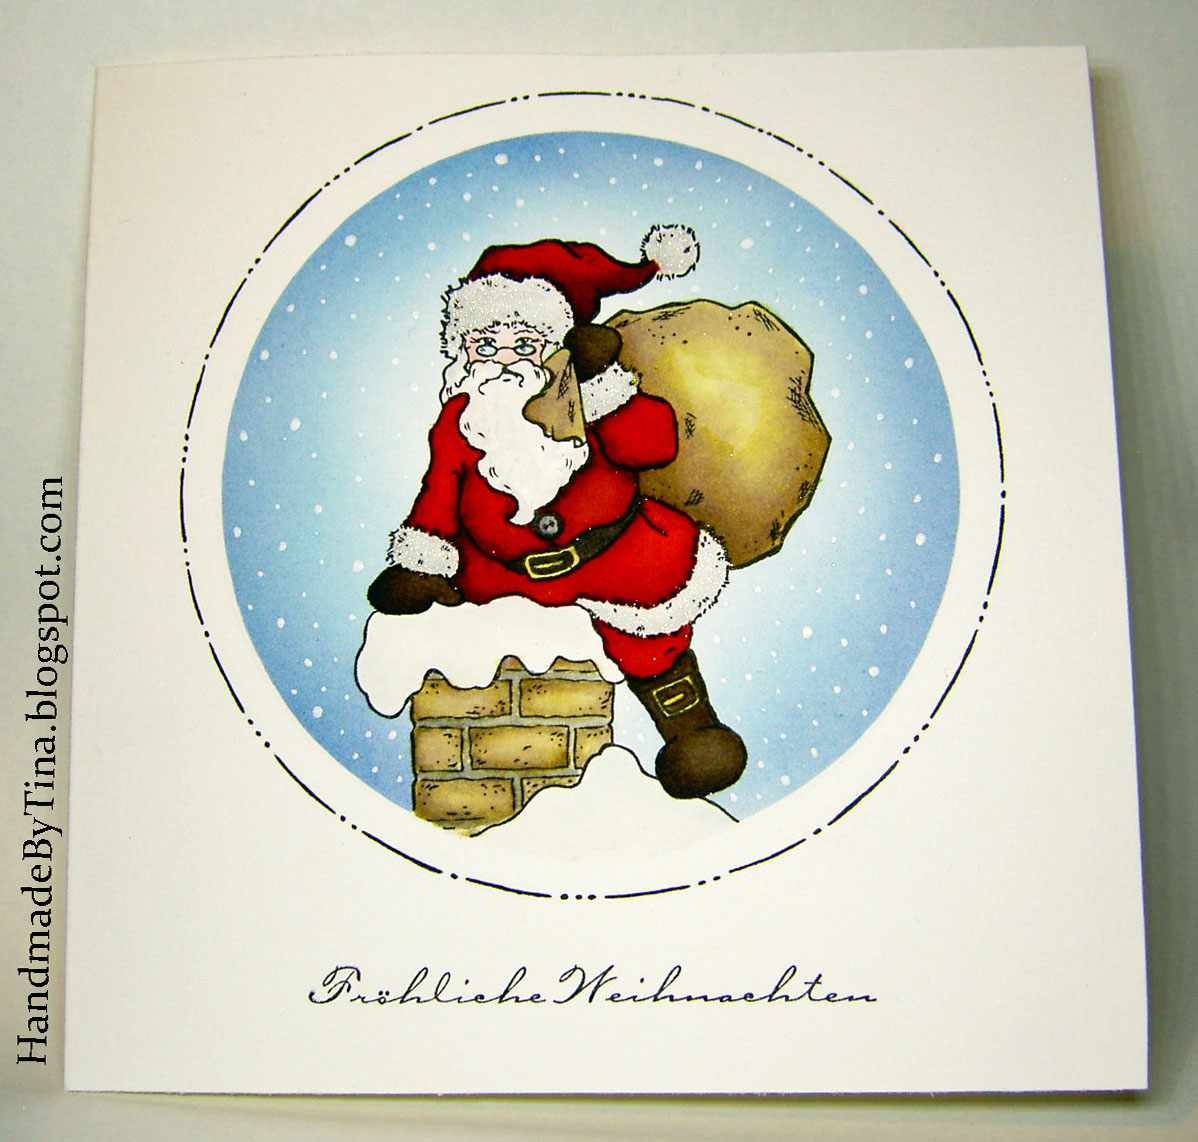
Today I want to share a christmas card with Santa on his way down the chimney.
The stamps i used are Santa V355 and the sentiment V721


I hope you enjoyed this post. Please leave a comment to let me know what you think.
//Tina

torsdag 20 november 2014

Christmas calories

Hello everyone!
In this post I want to inspire you with a christmas card I made with a cute little cupcake V110 and a suiting sentiment V805 to go along with it.
The sentiment is in german and it translates to "everyone knows that christmas calories doesn´t count".
I first stamped my sentiment, then masked off the line of words on the upper line with a strip of post-it and stamped my cupcake.
I colored my image and also made a background by masking off the edges of the paper and then used distress ink to color it in.

Thank you so much for checking in!
I hope you enjoyed, please leave a comment to let me know what you think.
//Tina

onsdag 12 november 2014

Dancing in the rain

Hello everyone!
This is my last post for today and I thought I´d share this little card. It´s only 10×10 cm, but I think that only adds extra cuteness, because small things equal CUTE! (wouldn´t you agree :)?)
The cute little manga girl (V232)  is from one of the Sugarbat kits and even though it´s raining she´s happy anyway! She is colored with Tattered Rose, Peacock Feathers and Picked Raspberry distress inks. As you probably know by now, I love using masking techniques, so of course I made a mask out of a post-it note and masked her off. I then masked off the edges of the card and used a blending tool and Black Soot distress ink to make the background. I took of the maskes and stamped my seniment (V723), and used a ruler to draw some lines around the card, I went back around the lines once again with the marker but without the ruler to make the lines look more organic. To finish it of I used a white gel pen to make the rain drops and the polka dots on her umbrella, coat and boots, and added a little shimmer to her hair and the raindrops.

PICT2229;E
Thanks for your visit. Don´t forget to leave a comment to let me know what you think!
//Tina

tisdag 11 november 2014

Take-away-mug container

Hello everyone!
In this post, I would like to show you a cute little container I made (believe it or not) out of a large corrugated take-away coffee mug. I got this idea from Jennifer Mcguire who did this folding technique, but with a small plastic cups. And I thought, why not try this? So I got this large-black-take-away-coffee-paper-cup and covered the whole thing in gesso, cut slits about half way down the cup and about 1.5 cm apart. I then punched holes in each flap to make room for the string to fit through, so I could pull the top closed. To decorate I punched out a strip of “lace” and adhered where the slits ends. I then made my tag. I punched out the tag three times in cardstock and adhered them back-to-back to make it a chipboard-like thickness and colored the edges black with a marker. I stamped the image and the words I wanted cut them out and colored the edges black. The words are from different stamp sets. “Höst” and “Favorit” are from the kit V743 and “En” and “Underbar” are from the kit V674 and the mushrooms are from V153.
PICT2189;E
PICT2193;E
I hope you enjoyed this post. Please leave a comment to let me know what you think.
//Tina

lördag 1 november 2014

Brevlådan, en favorit från förr.

Hej på er!
Idag fick jag en förfrågan om den här lådan som jag gjorde redan 2010 och jag lovade du att lägga ut den på nytt. Så här kommer en favorit från förr, den bokstavliga BREVLÅDAN.

Här kommer beskrivningen där jag visar hur en till synes enkel brevhög blir något alldeles extra!


Materialet du behöver är
7st. kuvert (Jag har använt C6)
6st. ark med wellpapp (Skrurna till något mindre storlek än kuverten)
1st. ark med cardstock (Valfri färg, är till lådans insida)
En bit spillpapper
Ink blending tool
Distress ink-stämpeldyna (Jag har använt "Vintage photo")
Dubbelhäftande tejp
Linjal
Skalpell
Skärmaskin
Falsben
Penna
Valfritt dekorationsmaterial

OBS! Jag har inte skrivit ut några mått, man kan använda vilken storlek på kuvert som helst och därmed ändra insidans storlek efter tycke och behag. Jag har använt C6 kuvert och insidans mått är 10X7cm. Givetvis kan man använda så många kuvert man vill. OBS!


Tack för titten!
Lämna gärna en kommentar och låt mig veta vad du tycker.
//Tina

onsdag 29 oktober 2014

Oktoberfest

Hello!
Today I want to show you a card I made for Oktoberfest. I know it´s a bit late, but I thought I´d show it to you anyway. Two of the stamps I used, I modified slightly, but don´t worry I´ll explain. The partygirl I modified by putting masking tape directly on the stamp, covering her left hand, the pile of gifts and the ribbon by her arm, I then applied ink to my stamp, removed the masking tape and stamped my image. That way, when I stamped it, the masked parts didn´t show. Next I stamped the beer glass, using the same technique as before to mask off the arm holding it. To get the correct placement, I used a stamp positioner to get the beer glass in place. Now it was time for free-hand drawing to fill in the gaps. I filled in her arm and hand, and then decided to change her top to my own version of a dirndl dress, based on pictures I found on google. I drew a corset and added some lace to her cleavage, gave her a table to rest her elbow on and to finish it off, gave her puffy arms on her dress. When I did the puffy arms on her dress, I drew lines a bit wider than the shoulder line and covered up the original stamped line with a white gel pen. I stamped my sentiment, put my card together and finished it off by stamping a few hearts and making an edelweiss-isch flower. The stamps I used are V806 and V746.
PICT2106;E
Below you can see how the stamps lookt originally.
123
1234
Thanks for your visit!
Please leave a comment to let me know what you think.
//Tina

lördag 25 oktober 2014

A card for cancer awareness

Hi there!
Since October is the official month for breast cancer awareness, I decided to make a card related to that. A while ago, I came upon a website, regarding cancer among youths and that inspired me to make a card that could be for a cancer victim. And since it´s October, I felt like breast cancer would be suitable.
To make my card I stamped the shoe image V672 and the sentiment from the kit V804,  which is actually a Christmas kit, but masked off the “at Christmas”-part on the sentiment, it actually works all year round. I then drew a pink ribbon on the shoes and added some white polka dots using a white gel pen and then put my card together.
PICT2201;E
Thank you so much for checking in, don´t forget to leave a comment and tell me what you think.
My condoleances to everyone affected by any type of cancer, directly or indirectly. My heart goes out to you!
//Tina

söndag 19 oktober 2014

Fjärils ATC

Hej hej!

Idag tänkte jag visa tre stycken ATC kort som jag gjorde till ett byte för ett tag sedan.


 Tack för titten!
//Tina

lördag 18 oktober 2014

Pysselvänner

Hej på er!
Här kommer ett kort som jag vill tillägna alla mina pysselvänner.
Såhär på hösten så lever ju pysselvärlden verkligen upp med alla pysselträffar som kommer igång nu när vädret blir kallare och man med gott samvete kan hålla sig inne och pyssla. Så på kortet har jag maskerat ihop en bild med tre vänner påväg till en pysselträff. Med texten på detta kortet vill jag även visa er hur man kan använda flera olika textstämplar till att skapa en egen textrad och jag tycker det blir extra kul med blandade typsnitt.
Stämplarna jag använt är:
“pyssel” V755
“och vänner” V492
“får själen” V387
“på gott humör” V750
Trädet V9
Staketet V700
Damen till höger V731
Damen i mitten V11
Damen till vänster V506


Lämna gärna en kommentar och tala om vad ni tycker.
Tack för titten!
//Tina

fredag 17 oktober 2014

Vinteruggla

Hej hej!
Idag vill jag inspirera er med en vinteruggla med julhälsning.
Stämplarna jag använt är V9 (trädgren), V678 (uggla) och V302 (god jul) från Vilda stamps.

Tack för titten!
//Tina

torsdag 16 oktober 2014

Julvänner

Hej på er!

Idag vill jag visa er ett kort med några vänner som sitter på after ski och väntar på varm choklad.
Stämplarna jag använt är: Tomten V356, snögubben V663, älgen V542 och texten V804. För att göra älgen lite juligare så fick han en julkula i hornet ;)


Thanks for checking in! Please leave a comment to let me know what you think!
//Tina

onsdag 15 oktober 2014

Christmas girl

Hi there!
Here´s my second post for today, It´s a card where I want to show you a way to use an “all-year-around-stamp” and make it look like it was made for christmas. Before I stamped my little girl, I masked off a part of her head. And the way you mask it off is that you place a piece of tape directly on your stamp where you dont want the image to show, then apply your ink, pull the tape off and you´re ready to stamp. And I then used a permanent marker to draw a Santa´s hat where the masking was done. I also drew a lace border on her collar and stripes on her arms ant legs, to make striped sleeves and leggings. So how could you use this on a card?
Scroll down to take a look…
 
 
So here´s the card I made with the altered image. I made a see-through front, using acetate.
And because I wanted to be able to see the inside to make it more interesting but also hide it a bit so it would be more of a surprise when you open it up, I used a permanent marker and drew a lot of christmas gifts to be placed around my little girl.


And when you open it up you can see the room she were standing in, but since there is both a front and back stamp of the girl you can also look out from the inside of the card and she looks like you were standing behind her. The only thing i modified among the other stamps is that i put/drew  some cookies in the glass jar.

Stamps I´ve used for this card
V331
V690
V468
V6
I hope you enjoyed this post and please leave a comment below to let me know what you think.
Thank you for checking in!
//Tina

tisdag 14 oktober 2014

Julstaden

Hej hej!
Här kommer ett julkort med mängder av maskering.
Tro det eller ej, men jag har endast använt två olika stämplar till detta kortet.
4136650-origpic-53c7f7.png_0_0_100_100_170_116_75 10138282-origpic-b6fc5d.png_0_0_100_100_170_236_75
V370              och                 V228
Och för att få till det höga huset så har jag stämplat botten först och sedan toppen.
På två av husen har jag ritat dit plankor och tegel för att få lite textur och skillnad på dom.

Jag lade även till lite text på vägskyltarna.
PICT1959;E

Tack för titten!
//Tina

måndag 13 oktober 2014

Amaryllis i juletid

Hej hej!
Här kommer dagens andra inlägg och det blir ett Julkort med en amaryllis V696 och en fin jultext V272 från Vilda stamps.
Tack för titten!
//Tina